How to Install Oxidized for Network Configuration Backup
Oxidized is an open-source project started by Saku Ytti and Samer Abdel-Hafez as an alternative to the very popular RANCID software. A little over a year ago, I created a RANCID server to backup the configuration of my network devices. It has been a good, stable piece of software that has been doing the job very well across hundreds of devices.
When I set up the RANCID server, I had heard of Oxidized, but the project wasn’t yet as far along as it is now. A few days ago, I decided to take another look at it. One of the things that made Oxidized more appealing to me right away is its companion web interface. While RANCID can be “web-enabled” with the viewvc interface, it is pretty limited in functionality. I found the Oxidized web interface to be exactly what I was looking for. It also supports a very wide range of network devices and network operating systems.
Compared to using viewvc with RANCID, Oxidized also lets you view current configurations and diffs between versions. However, Oxidized lets you search for terms across all the configurations. If only some of your devices have a very specific configuration or inventory item, you can search and only the devices matching will be displayed. For example, in my environment, I can search for “PVDM” and quickly see which of my Cisco routers contain DSPs.
The web interface is also very fast! I have approximately 500 devices being backed up, and the web interface is always extremely responsive. Another feature of the web interface is the status of the last device configuration poll. You can see how long it takes on average to pull a configuration from the device, the number of times the configuration backup failed, the failure rate, and the time of the last failure. This helped me to identify a broadband link that was consistently slow, because the average run time was much more than the other devices.
As wonderful as Oxidized is, one of its current drawbacks is a lack of good, complete documentation. When I set up an Oxidized server for my environment, I documented all of the steps I took, including caveats I encountered, to have a successful install. The following is a guide to setting up an Oxidized server on CentOS 7 with basic web authentication. Like many Linux-related installation instructions, there are multiple ways to reach the ultimate goal, and what I have done may not be the best, most secure, or optimized way, but I reached the end goal of a working installation.
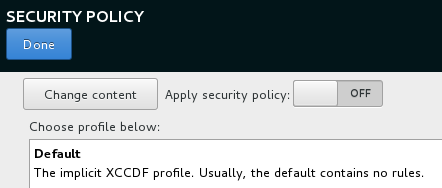
I am starting with a blank virtual machine and installing CentOS 7 x64 Minimal. During the installation, I chose to disable the security policy:
I configured networking as appropriate to my environment, including a static IP address, and relevant DNS settings. During installation, I also created an administrative user “oxidized”. You could use a different name, and you could create it after installation, but some of the scripts anticipate that you have an “oxidized” user on the system, and I found it easier to just create the user during the install.
After the first reboot, update the system, install a few tools, and disable SELinux. I use vi when I have to, but prefer nano. Of course, use the editor of your choice.
sudo yum -y update
sudo yum -y install git epel-release httpd-tools open-vm-tools nano
sudo nano /etc/sysconfig/selinux
    # Change to SELINUX=disabled #
sudo shutdown -r now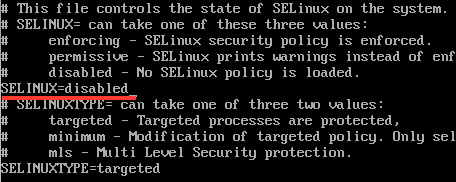
The Oxidized web interface does not have any native authentication. There is some discussion on the project’s GitHub page about it, but it was ultimately decided that attempting integrated web authentication would take away from the project’s core focus. Luckily, you can easily work around this by using nginx as a reverse proxy on the same server.
When Oxidized is configured (detailed later), the default option is to have it reachable on port 8888 only from the local system (127.0.0.1). We can install and configure nginx to act as a front-end reverse proxy server for Oxidized, which allows for full access customization. I configured it so that you can connect from any host to nginx on the standard port 80, using basic password authentication. Many other more secure options are available, including authenticating against an external server (LDAP, RADIUS, etc.), as well as connecting with HTTPS. My goal, however, was a basic working password- authenticated install.
First, install nginx:
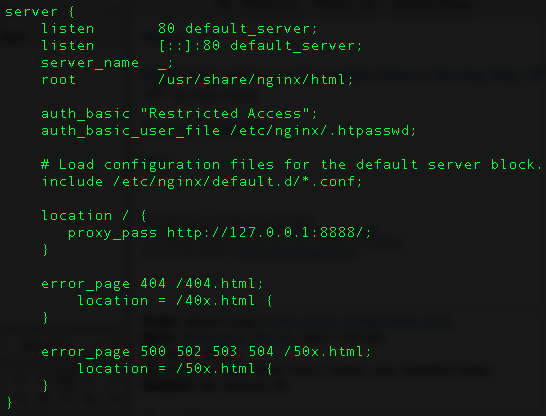
sudo yum -y install nginxNext, modify the nginx configuration:
sudo nano /etc/nginx/nginx.confAdd the following lines to the server { clause:
auth_basic "Restricted Access";
auth_basic_user_file /etc/nginx/.htpasswd;
location / {
    proxy_pass http://127.0.0.1:8888/;
}
The server { clause should look like this:
Then, create the username and password to be used for web authentication. This can be anything and is not coupled with any Linux authentication. I am using the username “oxidized” to keep it simple, but it does not have to be any user created on the Linux system.
sudo htpasswd -c /etc/nginx/.htpasswd oxidizedIf you need to add users in the future, run this command:
sudo htpasswd /etc/nginx/.htpasswd USERNAMETo remove users, edit the /etc/nginx/.htpasswd file and delete the entire line of the user to be removed.
Whether adding or removing users, be sure to restart nginx afterward:
sudo systemctl restart nginxEnable nginx to run as a service on system boot:
sudo systemctl enable nginxNow that the prerequisites are in place, let’s finally install and configure Oxidized.
sudo yum -y install cmake sqlite-devel openssl-devel libssh2-devel ruby gcc ruby-devel
sudo gem install oxidized
sudo gem install oxidized-script oxidized-web
The install for oxidized-script and oxidized-web takes a few minutes, and you can ignore ASCII/UTF-8 errors. Then, run Oxidized twice. The second run generates a more complete example configuration.
oxidized
oxidized
Edit the Oxidized configuration to make it appropriate to your environment.
nano .config/oxidized/configThe configuration is in YAML format. The changes I made for my environment are:
model: cisco
use_syslog: true
log: /home/oxidized/.config/oxidized/logs/
output:
  default: git
  git:
    user: oxidized
    email: oxidized@oxidized.com
    repo: "/home/oxidized/oxidized/git"
source:
  csv:
    map:
      username: 2
      password: 3
    vars_map:
      ssh_port: 4
model_map:
    nexus: nxos
    fortigate: fortios
    f5: tmos
The above only represents changes I made, not the entire YAML config file. I changed the default model to Cisco since IOS-based devices represent the majority of my network.
By default, Oxidized does not send logs to syslog, so I enabled that. The default output is to store the configurations in individual files. I changed this to take advantage of the built-in support for Git (using a local repository, in my case). The repository is created automatically, as long as the oxidized user has permissions for the specified directory.
You may wish to modify some of the other options. The default interval value is 3600 seconds, so the goal of Oxidized is to backup all of your devices in an hour. If you have many devices, or they are taking a long time to backup, Oxidized will automatically start multiple parallel threads to try to get everything backed up within an hour. It does this automatically by calculating how long it has taken to backup the devices so far in the individual pass, estimating how long it will take to finish the pass, and adding multiple threads accordingly. A related setting is the maximum number of threads. Unless you have an extremely large number of devices, you probably don’t need to modify this setting.
You may also wish to modify the default timeout and retry values. The timeout, in particular, may be set too low by default. The timeout specifies how long the attempt to backup the configuration can last – even if the connection is successful. In other words, with the default of 20 seconds, if your configuration is not fully backed up within 20 seconds, the attempt fails.
My source will be a file containing a list of devices, similar to how RANCID works. I mapped a few additional fields so that I could use individual usernames and passwords, as well as custom ports on specific devices, when needed.
Now we need to add some devices.
nano /home/oxidized/.config/oxidized/router.dbYou can specify by name (if using DNS resolution, or locally via /etc/hosts), or by IP address:
cisco-router1:cisco
nexus-switch1:nexus
fortigate-firewall1:fortigate:admin:password:2345
10.1.1.1:f5:::3456
# You can also include comments like this
The first line specifies a device named “cisco-router1” that is of the model “cisco”. If your device conforms to the defaults specified in the YAML config, these are the only two fields you need. The second line indicates a NX-OS device using the default username and password. The third line represents a FortiNet firewall using a different username, password, and SSH port. The fourth line specifies an IP address and the device type of “f5” (TMOS), using the default username and password, but using a non-standard SSH port. Finally, you can comment your file by including a # at the beginning of a line.
The next step is to do a test run of Oxidized, to make sure everything works the way it’s supposed to.
oxidizedIf all goes well, you’ll see that Oxidized is starting, the PID value, how many nodes it is loading from the router.db file, threads, IP address and port, and shortly afterward you should see confirmation of nodes being backed up by “Configuration updated” messages.
You can then log into the web interface by going to the IP address you configured (or if it’s DHCP, you can use the ifconfig command to see what your IP is). You should be greeted with authentication via nginx, and after you log in, everything should be similar to this example, but with your nodes.
After you determine everything is working successfully, the next step is to enable Oxidized as a service so that it will run automatically when the system boots. First, press ctrl-c to stop the execution of Oxidized.
sudo cp /usr/local/share/gems/gems/oxidized-0.19.0/extra/oxidized.service /lib/systemd/system/
sudo systemctl enable oxidized.service
sudo systemctl start oxidized
When you run Oxidized as a service, you can keep an eye on it by looking at the local syslog messages:
sudo tail -f /var/log/messagesSimilar to RANCID, one of the nice things you can do with Oxidized is to customize the device scripts. For example, you can add commands to be issued every time the device type is logged into.
For my IOS-based devices, I added the following:
sudo nano /usr/local/share/gems/gems/oxidized-0.19.0/lib/oxidized/model/ios.rb

#After the cmd 'show inventory' clause, add:

cmd 'show vlan brief' do |cfg|
 comment cfg
end

cmd 'show vtp status' do |cfg|
 comment cfg
end

cmd 'show interface trunk' do |cfg|
 comment cfg
end

cmd 'show ip interface brief' do |cfg|
 comment cfg
end
As you can see, most of these commands apply only to Catalyst switches, even though both IOS routers and switches use the same script. If the command is not supported by the device, it simply doesn’t appear in the configuration backup, or it may say “ambiguous command” or similar.
Do take care with the commands that you add, however. For example, it may be tempting to add something like “show cdp neighbors”, but the problem is that the output of this particular command displays the remaining hold time between devices. That value is almost definitely going to be different with every pass, causing the entire configuration to be backed up again, even though nothing has actually changed.
Whenever you make changes to the device scripts, be sure to restart Oxidized.
If you’re having issues, you can enable debugging:
nano .config/oxidized/config

input:
  debug: true
Enabling debug under the input causes Oxidized to create individual output files of each session under .config/oxidized/logs/IP-ssh or IP-telnet. This file is overwritten with each attempt, so it is best to troubleshoot devices one at a time and run Oxidized manually during this process.
For example, I was running into an issue with a subset of switches. There are a few Catalyst switches that do not have the k9 image, and therefore do not support SSH. Normally, this is no problem. Oxidized by default tries SSH first, and then falls back to Telnet automatically. However, all of my devices are authenticated against a TACACS server, and that server modifies the login prompt for Telnet.
By enabling debugging, I was able to see the full transcript and see that the device was failing during the login, because the login prompt was not what it was expecting. In this case, I modified the ios.rb file as above, and changed the Telnet section to match the prompt my devices expect to see. After editing the file, I restarted Oxidized, and it worked perfectly. I then disabled debugging, and started running the server as normal.
I have been using Oxidized to backup all of the devices on my network that RANCID used to cover for a few days now. It took me a little while to get it running the way I needed to, but seeing it replace RANCID in such a spectacular way made me pretty excited, and that’s why I wrote this guide. I think the authors have done a tremendous job of putting together a very useful piece of software. It is very focused on what it does, and does it very well. Since it is open source, it is also easy to customize it to your needs.